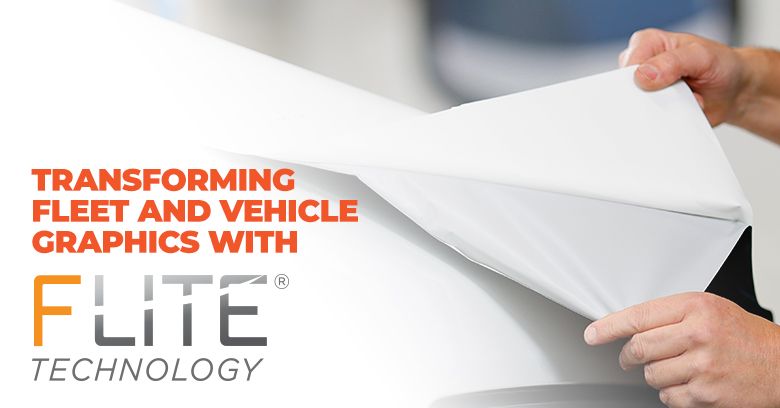
Signage

Arlon Floor Graphics – FAQ

There are so many overlaminate options for floor graphics specifically, why would you add another product to your inventory to service one application? Select Arlon overlaminates are now approved under regional regulations as slip-resistant for interior floor graphic applications. But, what does holding certification for floor graphics mean? And compatible media can you use with these overlaminates. Read below as we answer those questions and more in our Floor Overlaminates FAQ.

What Arlon products are certified as slip-resistant for interior floor graphic applications?

  • In North America, Series 3220 Gloss and Series 3420 Gloss & Matte are UL 410 approved for interior floor graphic applications.
  • In EMEA, Series 3220 Gloss, Series 3420 Gloss & Matte, and Series 3510 Matte overlaminate are approved under the EN 14041 regulation.
  • Latin America follows the guidelines set by UL 410 and EN 14041 and offers all of the products covered by both regulatory bodies for its region.
  • In Australia, Series 3420 Matte and Series 3510 Matte overlaminate are approved under the AS 142934&&.

What are the surfaces that Arlon recommends for interior floor graphics?

Arlon recommends its existing overlaminates for interior, short-term floor graphic applications with a compatible Arlon base film. The overlaminates previously mentioned can also be used for many other applications as well.

The recommended interior surfaces are smooth floors and low-profile carpet, including:

  • Waxed vinyl flooring
  • Sealed concrete
  • Marble
  • Ceramic tile
  • Sealed wood
  • Terrazzo
  • Low pile commercial-grade carpet

Low pile commercial-grade carpet is a carpet having shorter fibers with tighter fabric loops.

What technique do you recommend for installation on smooth floors and/or carpets?

For all interior floor surfaces, we recommend testing the compatibility of the media to ensure media will stay down, remove well, and not damage the surface. We recommend avoiding placing graphics in areas that are inclined to get wet.

For more installation best practices, please refer to Arlon’s Floor Installation Guide. For any additional questions, please contact Arlon’s Technical Services department at TS_Dept@arlon.com and (800) 232-7161.

What Arlon digital media do you recommend for floor graphic applications?

The recommended base film for smooth floors and low-profile carpet is DPF 8200 High Tack. The ultimate high tack calendered film for demanding surfaces.

For smooth floors only, DPF 4600GLX/MLX, DPF 510 GT/MT/GTR/MTR, and DPF 8000 High Tack are recommended.

Example of floor graphics being used for social distancing purposes.

Can the overlaminate be used with other Arlon products that aren’t listed as compatible? Can I use this overlaminate with other brands of media?

Arlon has done extensive testing on a variety of media to determine the best base film for the intended application. Currently, we do not recommend mixing and matching with other non-compatible base films or other competitor products.

What are the recommended printing platforms?

If the recommended base film and overlaminate are being used for floor graphic applications, then Solvent, Eco-Solvent, and Latex are compatible print platforms. UV inks are not recommended if the product combinations are being used for floor graphics due to the textured nature of the ink.  

What is the durability of the overlaminates?

The expected durability of the overlaminate is not associated with the durability of the overlaminate, as stated in Arlon’s Print Media Total System Warranty. These products are recommended for short term usage. To determine the best product for the application, Arlon always recommends testing on the actual surface before using the above products as product performance can vary greatly depending on the surface type, level of foot traffic, elemental exposure, the carpet type, and floor condition. Because of the variability of floor condition, no specific durability is given for floor graphics.

Floor graphics on hard wood flooring

Are there recommended tools for applying floor graphics?

Yes, our technical experts have outlined their recommended tools for successfully applying floor graphics.

  • Squeegee with Felt Tip: For applying media without damaging the graphic.
  • Felt Block Squeegee: For applying graphics on the carpet.
  • Masking Tape: Positioning the graphic.
  • 9mm Snap-off blades – Used to trim excess material.
  • Yellotools BodyGuard Knife – To cut the release liner.
  • Measuring Tape – Positioning and alignment.
  • Rigid Scraper: To scrape off floor contaminants.

What is the recommendation for prepping your surface for floor graphic installation?

Similarly to any other graphic application, diligent prepping and cleaning of the floor before installing floor graphics is critical to the success of the install. The video below outlines the steps to prep your surface for floor graphic installation.

For additional preparation, recommendations see our Interior Floor Graphic Installation Guide.

What is the recommended maintenance for a floor graphic?

To keep the vinyl looking it’s best, use a mix of mild soapy water to remove dirt from the vinyl, and adequately dry the graphic after cleaning.

Share This:

Read More
Signage Wall Applications

Tips for Installing High Tack Wall Films

Wall graphics provide a great opportunity to increase your sign shop’s revenue; they’re mostly straightforward, the surfaces are relatively flat, and they are faster to apply compared to a vehicle wrap. But what about high tack wall films? Unlike other wall films, the tack of these films can create a unique set of challenges. The good news is, we are here to help with our application tips for installing high tack wall films. 

Application Tips

Use an Overlaminate

When it comes to walls, the thickness of a high tack film is your friend. Although tackiness is primarily a feature of the adhesive, increasing the film’s thickness will stiffen it. A stiffer film will help reduce pre-tack and prevent pre-stretching.

Thoroughly Clean the Surface

Although some contaminants on the surface may ease the installation process by reducing the tack of the product, you also run the risk of the film failing prematurely.

  1. Clean the surface by first brushing it dry to knock off loose dirt. Follow it up with a wash either with a sponge and soapy water for painted smooth walls or power washing for exterior textured walls. NOTE: Soap works best as a degreaser because isopropyl alcohol does not wash off oils or grease.
  2. Rinse and let the surface completely dry.
  3. For painted smooth walls, wipe the surface with a 50% water/alcohol solution with multiple and heavy passes on the top, bottom, and side edges.

Aim For The Right Surface Temperature

The ideal surface temperature is between 65°F – 90°F (18°C – 32°C). It’s essential to stay the optimal application temperature range for the best performance, but we understand that’s not always a possibility. When applying in colder climates, the risk of the film tearing or shattering is very high. One of the best ways to avoid these issues is to take your time ensuring the proper alignment; this way, you won’t have to reposition the film risking a tear or shatter.  When applying in hotter climates, timing is key. Avoid the hottest hours of the day and apply when the sun is down or in the shade.

Dry-fitting and Registration Marks

Dry-fitting refers to taping up the panels onto the wall without removing the liner. This step allows you to preview the location of each panel and adjust if necessary. Once all the adjustments are made, create registration marks with a water-soluble pencil or tape.

Identify Your Key Panel

In some cases, the first panel does not have any of the design elements to be a proper reference for the remaining panels, like a text that needs to be level with the floor. Consult the mockup to identify your key panel and apply that first. For a more in-depth look into identifying panels, read our  Basic Guide to Registering Vinyl Graphics.

Consistent Technique

Having a consistent technique will help you avoid mistakes when applying a high tack film. There are several ways to start your panel–hinge, half-moon, full liner rip, etc.–but whichever method you use, make sure to use the same method and at the same distance from the top edge one for the remaining panels.

Support the Film’s Weight

Most installers just leave the bottom half of the film hanging as they apply the top half. The problem with this approach is the film’s weight will slowly stretch it without you noticing until it’s too late. Here’s a simple setup with a tube cut in half and zip-tied onto the scissor lift:

Site survey and the Wall/Building Questionnaire

The wall itself can also hinder the application because it has special paint that makes it not receptive to adhesive. So when surveying the site, make sure you use our wall/building questionnaire to aid you in determining the correct product(s) for your project.

Using the right application tips and proper setup will help alleviate any challenges you might have when applying a high tack film. If you’re looking for the right film for your next wall wrap, we’ve got you covered from hard-to-stick surfaces like brick, stucco or concrete to flat wall applications.

Get money back on wall wraps! From now until July 31st, we’re running our Essential Rebate promotion to learn more about what product qualify in your region click the links below.

Get money back on high tack wall films! From now until July 31st, we’re running our Essential Rebate promotion

USA/Canada

Australia/New Zealand

Share This:

Read More
Digital Printing Signage

Printed Decals 101

Producing printed decals is how many sign shops get started in the graphics industry. Nonetheless, if you’re just getting started or need a refresher, we worked with our Technical Expert, Louie Calma,  to outline the basics of printed decals; from what blade to use to when you should vector vs rendor your project.

Design

First, start with the design of the printed decal. If your decals have letters, consult a letter visibility chart for maximum impact. A rule of thumb is 10 feet viewing distance per inch height of the letter. For example, a 3-inch tall letter will be visible at 30 feet. Also note that if you are using the points (pt) system, 1-inch is equal to 72pt. However, if the sign or the viewer is moving, I would recommend 5 feet per inch with sans serif fonts.

Which blade to use?

Make sure to consult your plotter’s manual for your a suitable blade for your project. In most cases, thicker overlaminates such as ProTec Series 3960 or reflective films require a specific blade.  Once you have identified the correct blade for your project, make sure that both the blade and cutting strip are in good condition. Then, adjust the blade depth according to the thickness of your material. If you are cutting intricate shapes such as thin lines or pointed edges, check whether your cutter has a tangential or overcut function.

Check out this HUB post for tips and tricks on cutting and weeding small letters and decals.

Vector or raster?

Louie is a  big proponent of favoring vectors over raster images, especially when it comes to cut decals. Of course, it is possible to create printed decals with a raster image by tracing its edges and setting that up as a separate cut layer. However, it’s important to make sure you simplify or smooth the cut path, so you don’t end up with zigzag cuts. It will also be faster because a smooth path is shorter than zigzag.

If you’re running different software brands for RIP and design, always look up the procedure on how to correctly set up a cut path layer. Here’s an article from Roland DGA, The Perfect Setup: File Preparation For Print/Cut Production.

Can I cut through the liner?

Most printed decals are produced by cutting through the liner instead of just the print film, where the liner remains intact. This process involves more than increasing the blade depth and cut force. Doing these two things will cut through the liner, but the decals will also fall out immediately. If this happens, it means that as you’re cutting, some or most of the pinch rollers will have no film to pinch that you will lose registration or worse.

If you must cut through the liner while keeping them intact till the end of the job, there is a cutting process called PerfCut or perforated cut. Rather than cutting a continuous path, the blade will “skip” and leave tiny tabs so that the decals will hold onto the sheet until you pop them out. Each brand will differ on how to set up this process, but here are some online resources:

Which products should I use?

Arlon has a wide selection of products for your decal needs. For decals that are 4 inches tall or less, a film without air egress will suffice. Consider using air-egress films for larger or beginner-friendly decals.

DPF 510 is a typical product used for giveaway printed decals. DPF 4500 is your next choice for medium-term stickers like labels on standard surfaces. You can also consider using DPF 8200 High Tack for surfaces that need a high tack adhesive. Don’t forget to use an overlaminate to prolong the life of outdoor decals. Make sure to familiarize yourself with the print-lam-cut feature of your equipment.

Share This:

Read More
Digital Printing

Printer Maintenance for Idle Printers

Printers run thousands of hours with repetitive motions, and while it can be time-consuming, investing time into printer maintenance is a crucial step in keeping your printer running efficiently. But what if your printer has been idle and out of commission for a few weeks? Should you take extra steps before firing up your first print? Yes! Printers are designed to run for hours on end, so when they’re out of operation for an extended period, you need to take additional maintenance steps before starting up production.

Chi Chan, Arlon's Technical Engineer

Chi Chan, Arlon’s Technical Engineer, has put together the below tips to ensure success when rebooting your printer.

  1. Perform a manual maintenance cleaning by changing the printhead wiper and felt, and cleaning any ink around the printhead.
  2. Empty your ink waste tank to avoid dry ink from rubbing on the printheads during your auto clean. 
  3. Flush the ink that has been idle in the printhead for weeks by running your auto clean 1-3 times.
  4. Check your nozzles to ensure they are all healthy and don’t need to be replaced.
  5. Run a print test to confirm print quality, and this will also show you if there is banding being caused by clogged nozzles. If you do see a clogged nozzle,  repeat the cleaning process above until clear.
  6. Update your system. Before you resume production, make sure your software is the best it can be by making software and operating system updates.

Performing maintenance after your printer has been idle is a crucial step that will help increase the longevity of your printer and ensure your first print runs flawlessly. Are you looking for everyday printer maintenance? Check out our post on The Importance of Printer Maintenance.

Share This:

Read More
Digital Printing Signage

How to Mount Graphics on Large Substrates

How to Mount Graphics on a Large Substrate

In digital printing, UV printers and HP Latex R-Series now can print directly on a substrate, making mounting graphics on large substrates a thing of the past. Yet, not every sign shop will make that type of investment, and the alternative of mounting graphics on large substrates can be a challenge. To help this part of your application process, we’ve created a step-by-step guide on how to mount graphics on large substrates.

Step 1

Set up the laminator so that the rigid substrate is supported from the front and back. I’ll be using the platen of the UV printer (the flat part of the printer where the media rest during printing) to support the substrate as it feeds into the laminator and the table to catch the finished product.

Step 2

Open the nip all the way up and feed the substrate into the laminator in reverse.

You might be wondering: “Why not just use the UV printer to print directly on that 4’X8’ pegboard?” Good question! We didn’t print directly on the board because there is not enough space behind the printer to fit the substrate.

Step 3

Dry fit the graphic on the substrate to make sure that the graphic is positioned correctly relative to the substrate.

Step 4

Place a weight over the graphics and fold about 25% of the graphic’s leading edge.

Step 5

With a liner back slitter such as the YelloTools’ BodyGuard Knife -Teflon, cut a 2” strip hinge and remove the liner strip.

Step 6

Fold the leading edge back onto the substrate and apply the strip hinge with a squeegee.

Step 7

Manually feed the pre-mounted graphic into the laminator until the strip hinge is just past the nip rollers. The UV printer’s platen is only used to support the substrate.

Step 8

Square the substrate with the laminator, close the nip, and peel off the liner below the hinge strip.

Step 9

Run the laminator forward and carefully remove the liner by grabbing it as close to the middle for even tension.

Step 10

Once you reach the end of the substrate, rotate it 180° and feed into the laminator just past the strip hinge.

Step 11

Repeat from step # 9 and apply the remainder of the graphic. Trim excess film.

When mounting graphics for large signs, a little creativity can go a long way. Now that you know the steps, you’re ready to go out and mount those signs.

Share This:

Read More
Manufacturing

Cast or Calendered Film – What to use for a Vehicle Wrap

Before there was the question of which vinyl film to use on a vehicle wrap, paint was the only media of choice.  Fast-forward 70 years, factor in massive technological advances in adhesives and liners, we have today’s vehicle wrap films. With new technologies come new questions, such as do I need to use a Cast or Calendered product? And does a Cast film have the same service life as a Calendered film? If you ask yourself these questions before starting your vehicle wrap, you’re in the right place. We’re going to be answering these questions and more.

Vehicle Wrap Durability

Durability is the main driving factor when selecting a vehicle wrap film. Calendered film is designed with a short to mid-term range of durability (0-5 years); the film can also shrink up to 1/4”. Calendered film is an excellent option for short-term lettering, spot decals, or partial wraps. Full vehicle wraps require strategic paneling and seaming (piecing together) of the film over complex curves and bumpers.

Cast films are manufactured for long term use (5-11 years); when compared to Calendered, this vinyl will have immeasurable shrinkage. For long-term, full, seamless vehicle wraps, or long-term lettering, decals, and partial wraps Cast vinyl is a must.

How can you maintain the durability of a Cast or Calendered Film? When using an overlaminate, be sure to choose one of equal or better quality than the base film. Using a lower quality laminate will dramatically shorten the durability of the high-quality base film.

SLX Cast Wrap with Series 3270 Matte - Wrapped by Sign Biz WA
Vehcile Wrapped in a Cast film – SLX® Cast Wrap with Series 3270 Matte – Wrapped by Sign Biz WA

Cost Factor

Price can be the determining factor between bidding on or winning a job. When cost-driven opportunities are presented, and it’s short term, a Calendered film could be your vinyl of choice. If you select a Cast film over a Calendered for your vehicle wrap project, don’t be deterred by the cost. For the added durability, the increase is insignificant in mid to long term applications. The difference in price can also balance out in a few years when it is time for removal. Yes, removal.

Removal

Time is valuable, and using your time to remove a difficult vehicle wrap can be less than ideal. Why is the removal of Calendered film different than Cast? Calendered film can remove poorly due to the loss of essential polymers and plasticizers that give the film its durability. Also known as rot. Once this happens, the film is prone to come off in tiny pieces, leaving adhesive.

Choosing the right vehicle wrap film can make all the difference in the long-term profitability and workflow of your business.  Customers change, but the one thing that usually stays the same is the type of vehicle graphics. You now have the information you need to make an informed decision when selecting and purchasing a vehicle wrap film.   

Share This:

Read More
Signage Wall Applications

Basic Guide to Application Tape

Nowadays, there are endless types of application tapes on the market, and spending time deciding on which one to use can take up valuable install time.  To help you speed up the process, we’ve compiled a comprehensive basic guide with everything you need to know about application tape — from the different types to how to choose the right one for your next project.

What is Application Tape?

Application tape (app tape for short) is “a pressure-sensitive tape used to transfer cut vinyl graphics and printed films from their release liners to the application substrate.” Depending on its use, app tapes can be categorized as premask, pre-spacing tape, or transfer tape.

  • Premask – covers the entire panel of a graphic film and protects during storage, transport, and handling. It also provides extra stiffness to graphics with a liquid laminate instead of a film overlaminate.
  • Pre-spacing Tape –  used to mask cut graphics. It maintains the relative alignment and spacing between the letters and emblems within the same panel.
  • Transfer Tape – tape for heat transfer graphics commonly used for custom apparel.
Application Tape can be used to apply window graphics when using material such as Arlon's Ever Etched Cal/Cast.
Application Tape can be used to apply window graphics when using material such as Arlon’s Ever Etched Cal/Cast.

Choosing the Right Application Tape

When choosing the right application tape, these are the questions you need to ask:

Is it for pre-masking or pre-spacing?

The premask for UV-inks may be different from other ink types, as well as premasks for liquid laminated graphics vs. film overlaminates. The amount and type of liner exposed will also affect what kind of pre-spacing tape to use. For release liners with air egress, make sure to choose a tape designed to adhere to them. Etched glass films or any graphic with a textured finish require special app tapes. 

How will the graphics be stored and transported? 

Almost all tapes are okay to be stored for a  short period or transporting graphics stacked and flat. However, some graphic providers produce a large batch of graphics and will sit on the shelf for months. Make sure to choose an application tape that will not permanently bond to the graphic over time. Avoid storing the graphics in high heat or prolonged sunlight. For graphics that must be rolled for transport, choose a tape that will adhere well to exposed liners. Always roll the graphics with the masked side out and at least 6 inches in diameter.

Is the release liner easy or hard to remove?

If the graphics have a tight liner release, you may need to use a high tack tape to peel it off the liner. If the graphic is not releasing from the liner, flipping the graphic liner side up and peeling off the liner works most of the time. Always test the cut force before running a cut job and only use enough force for the film to weed well but not cut into the release liner. 

Is the application surface low surface energy or textured?

Ultimately, the graphic needs to adhere to the application surface more than the tape adhering to the graphic. So, if you use a high tack app tape, in the case with low surface energy substrates, you might peel off the graphic with the app tape. You can wait and let the adhesive build or assist the adhesion with little heat. One pro tip for paper app tapes is to spray water on its face and let it soak to 20-30 seconds to weaken the tape’s adhesive. For textured substrates, you might be better off with a low or medium tack tape because the graphic’s adhesive will not have enough surface contact to establish excellent adhesion.

Applying App Tape

Application tape is typically applied by hand. However, for large panels, we recommend using a roll-to-roll laminator or lamination table such as the Rollsroller3 or CWT4. When using these tables, make sure that the app tape is applied without tension, so the graphic remains flat and does not peel off the edges.

While It might be tempting to only have a single application tape for all your projects, it’s essential to make sure you’re choosing the right application tape for a successful install.  Make sure to consider the tape’s capability in storage, handling, and final application, not just if it will stick on your graphic. Want to learn more vinyl basics? Check out our Basic Guide to Registering Vinyl Graphics

Share This:

Read More
Manufacturing

Cast or Calendered Vinyl Film – To Spec Or Not To Spec

In the branded world we know today, there are vinyl films for every substrate. Concrete, porta-potties, and trains are all examples of branding on substrates we see every day. But when you choose a vinyl film for your next job, how do you know you’re making the right choice to maximize your profit? Step one in selecting a vinyl film is deciding between Cast or Calendered. Below we will take a quick look at the difference between a Cast or Calendered vinyl and how choosing the right film will help you improve your film spec odds tremendously.

Cast and Calendered 101

The terms Cast and Calendered refer to the ingredients used and the manufacturing method of each vinyl. Cast begins as a paint-like substance, called organosol. Orgnisol poured over a sheet and run through a series of ovens cures the liquid into a solid film, creating what we know as a Cast vinyl. Calendered film starts as a dough-like substance called plastisol, run between a series of hot rollers to press the film to the desired thickness. The casting process produces stress-free film, that over its lifetime, will have minimal shrinkage. In contrast, the calendering process produces stressed film, that over its much shorter lifetime, can shrink noticeably.

Cast or Calendered for Flat Surfaces

If you are applying to a Flat (2D) surface, you can choose between the two types of film based on the desired durability, especially in outdoor applications. Now, for short term durability, a calendered film will be your ideal selection. For long term, a cast film will be the way to go. For an indoor application with no exposure, use a calendered film, but keep in mind that it will still have some shrinkage.

Arlon's DPF 510 GTR a 3.2-mil (80 micron) calendered film.
Arlon’s DPF 510 GTR a 3.2-mil (80 micron) calendered film.

Cast or Calendered for Curved Surfaces

When applying to a curved (3D) or compound curved surface application, a cast film is your go-to. Does that mean you cannot use a calendared product? No! 3D application is possible with calendered film, but with little to no long-term durability.

Arlon SLX® Cast Wrap & Series 3270 Matte - Wrapped by Scribbles & Drips - Photography by J Cole Photography
Arlon SLX® Cast Wrap & Series 3270 Matte – Wrapped by Scribbles & Drips – Photography by J Cole Photography

Maximizing Durability

Film type isn’t the only thing you need to take into consideration when choosing which product to use; a proper laminate pairing is also essential. To increase your graphic’s durability, use a laminate of equal or better quality. For example, using a calendered base film with cast overlaminate is a great way to extend graphic durability by having the laminate stabilize the base film. Using a cast base film with a calendered overlaminate will work oppositely, allowing the laminate to shrink and cause failure.

When we break it down, a cast film is the best option for long-term (4+ years), 3D application. While calendered is the best option for 2D, short to mid-term (2+ years) application. Want to learn more about vinyl? Check out our blog on Pre-Installation Steps for Wall Vinyl Applications

Share This:

Read More
Wall Applications

Basic Guide to Registering Vinyl Graphics

Registering vinyl graphics can make applying multiple panels across a large graphic laborious. The good news is, we’re here to make your life easier! Today, we’re covering the fundamentals for registering vinyl graphics from creating the perfect registration mark to removing the liner. Here is it, our Basic Guide to Registering Vinyl Graphics.

Key Terms

We have outlined key terms that you will need to know to better understand how to register vinyl graphics.

  • Bleed – excess print that is trimmed away when the film is cut to final size.
  • Substrate Size – the size of the area to be applied on a substrate.
  • Skew – the wall or substrate, is level, square, etc.
  • Overlap – the amount of film that covers the next panel.
  • Registration Point – Easily identifiable, unique shape/line along the edge of a print in the overlap.
  • Key Panel – starting panel, usually determined by key graphic element or edge of the panel.
  • Tack Point – tape or exposed adhesive that will hold the panel to the wall or substrate during registration.

Registering Vinyl Graphics 101

Registering vinyl graphics, when used in wide format printing means, to adjust to secure exact correspondence. Printed graphics are designed to fit a specific substrate, but large graphics will have multiple printed panels requiring you to register/align your graphic to a substrate before installation.  But, why is registering appropriately critical to a successful installation? If not appropriately navigated, registering panels will take longer, then applying the panel or require removal and reinstallation. Knowing how to register your graphic properly will lower application time and increase quality and efficiency.

How to Register Vinyl Graphics

Step One – Layout and lineup your graphic by each panel on a clean table or flat surface, or two panels at a time, space allowing.

Step Two – Identify three registration points on each overlapping edge of the panels, a high, middle, and a low on the panel and fit them together.

Step Three – Use tape or a Stabilo pencil to make marks near the registration point. Tape works best and can be cut with a squeegee to release and maintain marks. The tape now becomes your general registration point.

Step Four – Using a liner knife, make a single cut in the liner 3″ – 5″ (7 cm – 13 cm) below your high registration point. This should be done prior to mounting to the substrate.

Step Five – Using tape or exposed adhesive, fit your key panel to the wall or substrate right above or below your registration marks. If you use the area of the registration marks, you run the risk of removing the mark or distorting the film with the registration mark on it.

Step Six – Once the panel is fitted with no tension, release any lower tack points of the panel and pull the liner from the liner slit just under the first registration or tack point. Pull the liner tight against itself with even tension.

Step Seven – Once you have exposed 8″ – 10″ (20 cm – 25 cm) of adhesive while pulling the liner, begin application at the point of the liner slit. Work down the panel and then remove the liner and apply the upper 15-20% of the panel.

Step Eight – Remove the visible registration marks and repeat the process for each remaining panel.

As you can see, the proper registration of vinyl graphics can save you time, frustration, and increase your productivity.

Are you installing wall graphics? Before you take the above steps on vinyl graphic registration, make sure you watch our video on how to test your wall for media compatibility.

Share This:

Read More
Corporate Digital Printing Signage

COVID-19: Free Downloadable Signs

As we deal with the COVID-19 pandemic, signage is playing a crucial role in keeping communities safe and informed. We understand the challenges businesses are facing, and we are committed to doing our part in assisting in any way we can. Our team has come together to create downloadable signs for you to use that communicate essential information to the public, your customers, or your employees.

All signs are available in high visibility and low ink options as well as English and Spanish. To download the files, click the link below each image group.


COVID-19 Prevention Signage


Physical Distancing Signage


Prevention Posters


Healthcare Signage


Restaurant Signage


General Open and Closed Signage


Curbside Pickup Signage

Covid-19 Orange Curbside Pick-up Here Sign
Click to Download English
Click to Download Spanish

Share This:

Read More
1 2 3 4 5
Translate »